
How to install hadoop 2.7.3 single node cluster on ubuntu 16.04
In this post, we are installing Hadoop-2.7.3 on Ubuntu-16.04 OS. Followings are step by step process to install hadoop-2.7.3 as a single node cluster.
Before installing or downloading anything, It is always better to update using following command:
$ sudo apt-get update
Step 1: Install Java
$ sudo apt-get install default-jdk
We can check JAVA is properly installed or not using following command:
$ java –version

Step 2: Add dedicated hadoop user
$ sudo addgroup hadoop
$ sudo adduser --ingroup hadoop hduser
NOTE: don’t write password or any things here, Just press ‘y’ when it ask “Is the information correct?[Y|n]”

$ sudo adduser hduser sudo
Step 3: Install SSH
$ sudo apt-get install ssh
Step-4: Passwordless entry for localhost using SSH
$ su hduser

Now we are logined in in ‘hduser’.
$ ssh-keygen -t rsa
NOTE: Leave file name and other things blank.
$ cat ~/.ssh/id_rsa.pub >> ~/.ssh/authorized_keys
$ chmod 0600 ~/.ssh/authorized_keys
$ ssh localhost

Use above command and make sure it is passwordless login. Once we are logined in localhost, exit from this session using following command
$ exit
Step 5: Install hadoop-2.7.3
$ wget https://archive.apache.org/dist/hadoop/core/hadoop-2.7.3/hadoop-2.7.3.tar.gz
$ tar xvzf hadoop-2.7.3.tar.gz
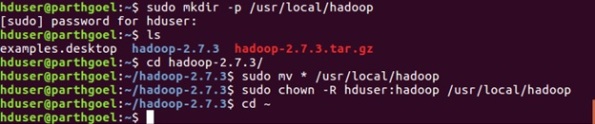
$ sudo mkdir -p /usr/local/hadoop
$ cd hadoop-2.7.3/
$ sudo mv * /usr/local/hadoop
$ sudo chown -R hduser:hadoop /usr/local/hadoop
Step 6: Setup Configuration Files
The following files should to be modified to complete the Hadoop setup:
6.1 ~/.bashrc
6.2 hadoop-env.sh
6.3 core-site.xml
6.4 mapred-site.xml
6.5 hdfs-site.xml
6.6 yarn-site.xml
6.1 ~/.bashrc
First, we need to find the path where JAVA is installed in our system
$ update-alternatives --config java

Now we append at the end of ~/.bashrc:
It may possible vi will not work properly. If it does install vim
$ sudo apt-get install vim
Open bashrc file using command:
$ vim ~/.bashrc
Append following at the end. (Follow this process -> First append below content at the end by pressing ‘INSERT’ or ‘i’ key from keyboard-> Press ‘ecs’ -> Press ‘:’ (colon) -> Press ‘wq’->Press ‘Enter’ Key)
#HADOOP VARIABLES START
export JAVA_HOME=/usr/lib/jvm/java-8-openjdk-amd64
export HADOOP_HOME=/usr/local/hadoop
export PATH=$PATH:$HADOOP_HOME/bin
export PATH=$PATH:$HADOOP_HOME/sbin
export HADOOP_MAPRED_HOME=$HADOOP_HOME
export HADOOP_COMMON_HOME=$HADOOP_HOME
export HADOOP_HDFS_HOME=$HADOOP_HOME
export YARN_HOME=$HADOOP_HOME
export HADOOP_COMMON_LIB_NATIVE_DIR=$HADOOP_HOME/lib/native
export HADOOP_OPTS="-Djava.library.path=$HADOOP_HOME/lib"
#HADOOP VARIABLES END
Update .bashrc file to apply changes
$ source ~/.bashrc
6.2 hadoop-env.sh
We need to modify JAVA_HOME path in hadoop-env.sh to ensure that the value of JAVA_HOME variable will be available to Hadoop whenever it is started up.
$ vim /usr/local/hadoop/etc/hadoop/hadoop-env.sh
Search JAVA_HOME variable in file. It may first variable in file. Do Change it by following:
export JAVA_HOME=/usr/lib/jvm/java-8-openjdk-amd64

6.3 core-site.xml
core-site.xml file has configuration properties which are requires when Hadoop is started up.
$ sudo mkdir -p /app/hadoop/tmp

$ sudo chown hduser:hadoop /app/hadoop/tmp
Open the file and enter the following in between the tag:
$ vim /usr/local/hadoop/etc/hadoop/core-site.xml
<property>
<name>hadoop.tmp.dir</name>
<value>/app/hadoop/tmp</value>
</property>
<property>
<name>fs.default.name</name>
<value>hdfs://localhost:54310</value>
</property>

6.4 mapred-site.xml
By default, the /usr/local/hadoop/etc/hadoop/ folder contains /usr/local/hadoop/etc/hadoop/mapred-site.xml.template file which has to be renamed/copied with the name mapred-site.xml:
$ cp /usr/local/hadoop/etc/hadoop/mapred-site.xml.template /usr/local/hadoop/etc/hadoop/mapred-site.xml
The /usr/local/hadoop/etc/hadoop/mapred-site.xml file is used to specify which framework is being used for MapReduce.
We need to enter the following content in between the tag:
$ vim /usr/local/hadoop/etc/hadoop/mapred-site.xml
<property>
<name>mapred.job.tracker</name>
<value>localhost:54311</value>
</property>
<property>
<name>mapreduce.framework.name</name>
<value>yarn</value>
</property>

6.5 hdfs-site.xml
We need to configure hdfs-site.xml for each host in the cluster which specifies two directories:
- Name node
- Data node
These can be done using the following commands:
$ sudo mkdir -p /usr/local/hadoop_store/hdfs/namenode
$ sudo mkdir -p /usr/local/hadoop_store/hdfs/datanode
$ sudo chown -R hduser:hadoop /usr/local/hadoop_store
Open hdfs-site.xml file and enter the following content in between the tag:
$ vim /usr/local/hadoop/etc/hadoop/hdfs-site.xml
<property>
<name>dfs.replication</name>
<value>1</value>
</property>
<property>
<name>dfs.namenode.name.dir</name>
<value>file:/usr/local/hadoop_store/hdfs/namenode</value>
</property>
<property>
<name>dfs.datanode.data.dir</name>
<value>file:/usr/local/hadoop_store/hdfs/datanode</value>
</property>

6.6 yarn-site.xml
Open hdfs-site.xml file and enter the following content in between the tag:
$ vim /usr/local/hadoop/etc/hadoop/yarn-site.xml
 <property>
<name>yarn.nodemanager.aux-services</name>
<value>mapreduce_shuffle</value>
</property>

Step7: Format hadoop file system
$ hadoop namenode –format

Step 8: Start Hadoop Daemons
$  cd /usr/local/hadoop/sbin

$ start-all.sh

We can check all daemons are properly started using following command:
$ jps

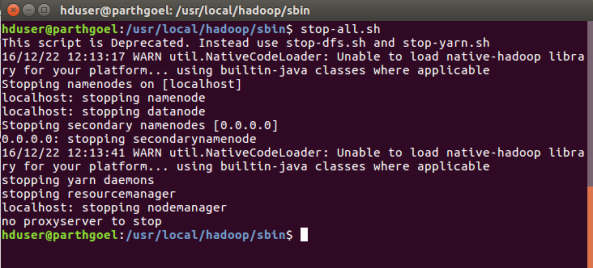
Step 9: Stop hadoop Daemons
$ stop-all.sh
Congratulation..!! We have installed hadoop successfully.. 🙂
Hadoop has Web Interfaces too. (Copy and paste following links in your browser)
NameNode daemon: http://localhost:50070/

mapreduce: http://localhost:8042/

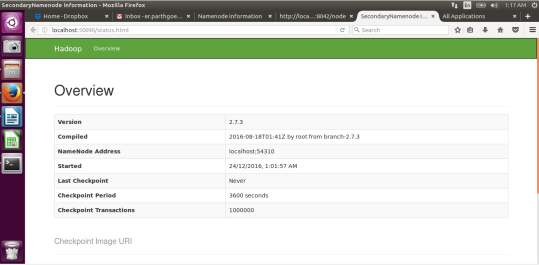
SecondaryNameNode:: http://localhost:50090/status.html
Resource Manager: http://localhost:8088/

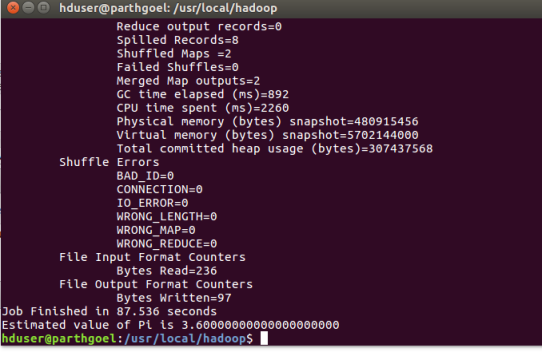
Now, we run mapreduce job on our newly created hadoop single node cluster setup.
hduser@parthgoel:/usr/local/hadoop$ hadoop jar ./share/hadoop/mapreduce/hadoop-mapreduce-examples-2.7.3.jar pi 2 5
You may like this post:
How to Create Word Count MapReduce Application using Eclipse
NOTE: Whenever we login in Ubuntu, make sure you are in ‘hduser’.
If you are not in hduser, use below command to login in ‘hduser’
$ su hduser

Now you can use all hadoop commands here.
Enjoy..!! Happy Hadooping..!! 🙂
NOTE/error: Once we run any mapreduce program and then you format the namenode, you start all services, it may possible that data node may not get started.
Solution:
Your datanode is not starting because You formatted the namenode again. That means you have cleared the metadata from namenode. Now the files which you have stored for running any mapreduce job are still in the datanode and datanode has no idea where to send the block reports since you formatted the namenode so it will not start.
$ sudo rm -r /usr/local/hadoop_store/hdfs/datanode/current
$ hadoop namenode -format
$ start-all.sh
$ jps
Again Congratulations…!!! Now we can run any hadoop example on this single node cluster. Just make sure you are login in ‘hduser’ because our hadoop setup is available on this dedicated ‘hduser’.

January 4, 2017 at 3:11 pm
Very nice step by step tutorial.
Thanks
LikeLike
February 9, 2017 at 12:40 pm
i done all steps till finished setup done thanks
but http://localhost:50070/
not working can tell me why? and how it to work
LikeLike
February 9, 2017 at 1:59 pm
Make sure-Namenode is working properly.
LikeLike
June 8, 2017 at 9:33 am
Even I too got the same issue. What is the problem?
LikeLike
February 1, 2018 at 10:36 am
You should not stop demons.Make sure that after start-all.sh command execution then go to browser and the type http://localhost:50070/ then you will get it.
LikeLike
February 14, 2017 at 8:47 am
HI , I am installing Hadoop 2.7.3. I follow the exact steps mentioned. My secondary name node is not getting stared. Secondary name Node is not getting started.When I am running JPS command ,it doesn’t shows secondary name node.
Plse help me regarding this.
LikeLike
February 14, 2017 at 9:05 am
Which exceptions are you getting?
LikeLike
February 18, 2017 at 11:11 am
[…] NOTE: In this post, you have learned WordCount Application in eclipse using MapReduce. In the next post, I will guide you how to export jar files from eclipse and run on Hadoop. (If you don’t know, how to configure Hadoop click here) […]
LikeLike
March 14, 2017 at 6:52 pm
Excellent! very detailed and clear instructions. Thanks.
LikeLike
March 17, 2017 at 8:01 am
Hello Parth, is there anything to be added to this to get it done on Ubuntu 14.04??
LikeLike
March 17, 2017 at 8:10 am
Hi Shekhar, I have not tried on Ubuntu 14.04. We use all general commands related to hadoop, so i don’t think so OS version will be an issue.
LikeLiked by 2 people
March 20, 2017 at 2:16 pm
hi shekhar,I have done all the steps mentioned above but my namenode is not running and i unable to perform hadoop fs or dfs -ls command ,its showing error that it is unable to load class file.
thanks.
LikeLike
March 20, 2017 at 2:33 pm
Make sure to create namenode folder and change owenership for hduser and provide proper path of namenode in hdfs-site.xml
LikeLike
April 11, 2017 at 4:37 pm
Namenode folder is created and also has ownership for hduser. Path of namenode is also provided in hdfs-site.xml but namenode is still not starting when I execute start-all.sh
LikeLike
April 13, 2017 at 2:53 pm
It worked very well…namenode is now starting…problem fixed….thanks.
LikeLike
March 29, 2017 at 11:46 am
Awesome!
LikeLike
March 29, 2017 at 2:19 pm
Thanks
LikeLike
April 13, 2017 at 10:35 am
This is really good but I find that all the folders in hadoop are like this now there is no simple hadoop/bin file anymore does this mean I have to update all the paths in the .bashrc file and go to each folder like hdfs and common to execute the various commands now ?
Any help v appreciated can’t find any references on stack or anywhere else about this
Thanks
Rob
hduser@GGH-D-HADAPP-L2:/usr/local/hadoop$ ls -la
total 204
drwxr-xr-x 16 hduser hadoop 4096 Mar 2 17:47 .
drwxrwxrwx 12 root root 4096 Apr 11 16:31 ..
-rw-r–r– 1 hduser hadoop 13050 Aug 12 2016 BUILDING.txt
drwxr-xr-x 3 hduser hadoop 4096 Mar 1 16:59 dev-support
drwxr-xr-x 3 hduser hadoop 4096 Mar 1 16:59 hadoop-assemblies
drwxr-xr-x 2 hduser hadoop 4096 Mar 1 16:59 hadoop-build-tools
drwxr-xr-x 2 hduser hadoop 4096 Mar 1 16:59 hadoop-client
drwxr-xr-x 10 hduser hadoop 4096 Mar 1 16:59 hadoop-common-project
drwxr-xr-x 2 hduser hadoop 4096 Mar 1 16:59 hadoop-dist
drwxr-xr-x 6 hduser hadoop 4096 Mar 1 16:59 hadoop-hdfs-project
drwxr-xr-x 9 hduser hadoop 4096 Mar 1 16:59 hadoop-mapreduce-project
drwxr-xr-x 3 hduser hadoop 4096 Mar 1 16:59 hadoop-maven-plugins
drwxr-xr-x 2 hduser hadoop 4096 Mar 1 16:59 hadoop-minicluster
drwxr-xr-x 3 hduser hadoop 4096 Mar 1 16:59 hadoop-project
drwxr-xr-x 2 hduser hadoop 4096 Mar 1 16:59 hadoop-project-dist
drwxr-xr-x 16 hduser hadoop 4096 Mar 1 16:59 hadoop-tools
drwxr-xr-x 3 hduser hadoop 4096 Mar 1 16:59 hadoop-yarn-project
-rw-r–r– 1 hduser hadoop 84854 Aug 12 2016 LICENSE.txt
-rw-r–r– 1 hduser hadoop 14978 Aug 12 2016 NOTICE.txt
-rw-r–r– 1 hduser hadoop 18993 Aug 12 2016 pom.xml
-rw-r–r– 1 hduser hadoop 1366 Aug 12 2016 README.txt
hduser@GGH-D-HADAPP-L2:/usr/local/hadoop$
.
LikeLike
April 13, 2017 at 2:32 pm
Sorry ignore me being daft I forgot I had to do the build off the source this is a great tutorial
LikeLike
April 10, 2017 at 9:33 am
For hadoop 2.7.3 then command “hadoop namenode –format” is depreciated, and we should use ” hdfs namenode –format”. thanks …great work…..
LikeLiked by 2 people
July 29, 2017 at 6:19 am
ok
LikeLike
May 16, 2017 at 12:24 pm
Thanks for the excellent step by step guide. It works great.
LikeLike
June 16, 2017 at 8:26 am
Thanks very much for the post. Really useful for novice person.
LikeLike
June 17, 2017 at 10:50 am
namenode not started
when I run jps, this is my output
hduser@sheshant-Inspiron-3521:/usr/local/hadoop/sbin$ jps
18842 ResourceManager
18467 DataNode
18688 SecondaryNameNode
19076 Jps
18988 NodeManager
hduser@sheshant-Inspiron-3521:/usr/local/hadoop/sbin$
LikeLike
June 17, 2017 at 12:37 pm
nevermind I followed this answer
https://stackoverflow.com/questions/8076439/namenode-not-getting-started
LikeLike
August 2, 2017 at 6:44 am
yeah it is very useful for the installation process
LikeLike
August 2, 2017 at 6:45 am
it is very useful for the installlation process…
LikeLike
August 4, 2017 at 9:46 am
Thank you
LikeLike
August 31, 2017 at 7:52 am
IMPORTANT:
“NILESH BHOSALE said:”
For hadoop 2.7.3 then command “hadoop namenode –format” is depreciated, and we should use ” hdfs namenode –format”. thanks …great work…..
LikeLike
September 20, 2017 at 8:35 am
very nice…
LikeLike
September 25, 2017 at 7:58 am
Some hints and variations I had to applied to make things work / work better for me:
– after installing java, had to open a new session for it to take effect (maybe could have reloaded .bashrc or something)
– I did set a password for hduser, and having root access, it think it may be a good idea
– after installing ssh, I had to restart it to make it work: sudo service ssh –full-restart
– downloading hadoop .tag.gz: provided server seems to host only the latest version, I downloaded http://www-us.apache.org/dist/hadoop/common/hadoop-2.7.4/hadoop-2.7.4.tar.gz
– when extracting, use tar xzf (without the v) to suppress extensive output
– for formatting, use hdfs namenode –format
– in order to get the secondary name-node running, I had to run format again after start-all, then rerun the start-all script.
LikeLike
October 9, 2017 at 1:28 pm
Hi. I am unable to run command – hadoop namenode –format and getting the below error:
raj@raj-VirtualBox:~/hadoop-3.0.0-beta1/bin$ ./hadoop namenode -format
WARNING: Use of this script to execute namenode is deprecated.
WARNING: Attempting to execute replacement “hdfs namenode” instead.
WARNING: /usr/local/hadoop/logs does not exist. Creating.
mkdir: cannot create directory ‘/usr/local/hadoop/logs’: Permission denied
ERROR: Unable to create /usr/local/hadoop/logs. Aborting.
Please assist
LikeLike
October 21, 2017 at 9:43 am
thank you so much sir. you helped me a lot.
LikeLike
November 18, 2017 at 2:34 pm
A big thank you…!!!
LikeLike
January 3, 2018 at 4:06 am
I am not expert this is the first time I am using Hadoop. Following worked for me…
Found a Solution for secondarynamenodes not starting. This worked like a charm for me.
Problem is hdfs getconf -secondarynamenodes is not not able to get node result as 0.0.0.0.
Here is the output that I see.
/usr/local/hadoop/bin$ . hdfs getconf -secondaryNameNodes
2018-01-02 21:20:11,029 WARN util.NativeCodeLoader: Unable to load native-hadoop library for your platform… using builtin-java classes where applicable
0.0.0.0
Instead of geting 0.0.0.0 this function is returning whole error message as string. so not able to start secondarynamenodes properly.
Here is the solution that I found.
Made changes to .bashrc in hduser home directory.
Old entry:
export HADOOP_OPTS=”-Djava.library.path=$HADOOP_HOME/lib/”
New Entry:
export HADOOP_OPTS=”-Djava.library.path=$HADOOP_HOME/lib/native”
This helped to fix util.nativecodeloader error.
I still have http://localhost:50070/ and http://localhost:50090/status.html not working.
LikeLike
January 8, 2018 at 7:06 pm
WARNING: DEFAULT_LIBEXEC_DIR ignored. It has been replaced by HADOOP_DEFAULT_LIBEXEC_DIR.
ERROR: Invalid HADOOP_YARN_HOME
im getting this error when i am doing the “hadoop namenode –format” command.
what should i do???
LikeLike